1 Can Black Beans, drained
1 Can Corn, drained
1 bunch Cilantro, chopped
1 Onion, red or white
Tomatoes, as many as you want, diced (or 1 can drained diced tomatoes(I also added half a can of Rotel tomatoes for a little kick))
1 Tbsp Lime Juice
Dressing:
About 1 Cup Mayo
About 1/4 cup heavy cream
2 tsp. cumin
1 garlic clove, minced
salt and pepper to taste
Mix all together and let marinate in the fridge for at least an hour. Perfect with tacos or as a dip or all by itself.
Showing posts with label Snacks. Show all posts
Showing posts with label Snacks. Show all posts
Monday, December 26, 2011
Friday, December 2, 2011
23 Days Until Christmas and Popcorn Recipe
Day 2
Today is Friday and we have Christmasy plans for the evening. We get to decorate the city Christmas Tree and have a little party with my oldest daughters' Girl Scout troop. After this, we are headed to Barnes and Noble's to sing carols and read Christmas stories.
When we get home (and so we can include the kids who aren't able to make the Girl Scout events), we are going to watch Jim Carrey's A Christmas Carol... with popcorn of course!
Here is our most favorite popcorn recipe:
1/4 Cup Coconut Oil
1 Cup Popcorn Kernals
1 Big Pop with good lid (the popcorn will almost fill the pot. This makes a lot of popcorn)
Pop holders
Real Butter (we use about 3/4 of a stick for this pot's worth)
On stove over medium heat, melt coconut oil in pot. Dump in the popcorn kernels and put lid securely on. Using the pot holders (because sometimes steam will escape or the handles will get too hot), shake the pot every few seconds until the kernels start to pop. Once they are popping, shake the pop continuously so the popcorn doesn't burn. Make sure the pot stays in contact with the heat source. (You kind of swirl the pot over the burner). The popping noise will start to slow down and when you only hear one or two pops every few seconds, remove the pot from the heat. Take the lid off immediately (beware of steam) so the kernels don't get wet. Melt some butter, drizzle over popcorn and toss the popcorn so it gets all over the kernels, season to your preference and enjoy!
Thursday, November 19, 2009
Berry Berry Streusel Bars-A.K.A. Granola Bars
Years ago, I was given this recipe from a friend. I quickly fell in love with it. I have played with it and played with it until it has become a favorite snack/dessert/breakfast treat for all of us. It is originally from QuakerOats.com. I hope you enjoy as much as we do!


You are only going to see pictures like this because it went from the pan to all gone in 60 seconds flat. (Have I mentioned my 6'3" 14 yr old who is a walking stomach?)
You can see the yummy jelly coming up through the topping. Yum!
Berry Berry Streusel Bars - A.K.A. Granola Bars
1 1/2 Cups Oats (old fashioned OR instant-it doesn't matter)
1 1/4 Cups Flour (I like to use half whole wheat flour)
1/2 Cup Brown Sugar, packed
12 Tbsp. Very Cold Butter (it helps it be crunchy on the outside and soft in the middle)
1 Jar (about 8 oz.) of your favorite Jelly or Jam
1 tsp. flour
Preheat oven to 350 degrees F.
1. Mix together oats, flour, and brown sugar.
2. Cut in the butter, like a pie crust. You want the mixture to be crumbly. I use my stand mixer or food processor to help with this.
3. In a greased 8x8 or 9x9 pan, press in about 1/2 to 2/3 of the oat mixture. Save the rest for the topping. Press it in good.
4. Bake for 13 to 15 minutes. You want it just barely starting to brown.
5. While that is baking, mix together the jam and 1 tsp. flour. (When I double the recipe, I use a Tbsp. of flour to 16 oz. of jelly). Mix it well.
6. After you pull the crust out of the oven, pour the jam mix all over the top. Spread it out as evenly as possible. If you can help it, try not to get the jelly onto the pan sides. It tends to become a bit sticky.
7. Take the rest of your oat mixture and sprinkle it, using your fingers, all over the top. Cover the jelly with the topping as best you can and gently press it down into the jelly using your hands.
8. Bake for another 20 to 25 minutes or until golden brown on top.
9. Cut into squares and enjoy!
For more fun recipes to try, go over to the Grocery Cart Challenge every Thursday for their recipe swap!
Saturday, September 12, 2009
Banana Oatmeal Chocolate Chip Cookies
I had some bananas I HAD to use. You know the kind: almost, but not quite yet, oozing onto the counter. The kind that you look at and think "mmmm, banana bread." Except today I decided to get online and see if I could find something different to do with my bananas. Here is what I found: Low Fat Banana Oatmeal Cookies.
Only, my version are NOT low fat and I altered the recipe a bit. I really like these. They remind me of Fall and taste a bit like banana bread.

1/2 Cup Sugar
1/2 Cup Brown Sugar
1 Cup Softened Butter
2 Eggs
2 tsp. Vanilla
2 Cups Flour
1 tsp. Baking Soda
2 tsp. Cinnamon
1/2 tsp. Ground Cloves
3 Ripe Bananas, mashed
2 Cups Rolled Oats
1 Cup Chocolate Chips
1. Preheat oven to 375 degrees
2. In a large bowl mix together sugars and butter until creamy.
3. Add in eggs, vanilla, and bananas.
4. In a separate bowl mix together all dry ingredients except the oats and chocolate chips.
5. Add dry ingredients into wet and mix well.
6. Fold in oats and chocolate chips.
7. Drop by spoonful onto baking sheet.
8. Bake for 10-14 minutes.
9. Let cool a few minutes before trying to take them off the pan or they will fall apart.
For more great recipes, check out The Grocery Cart Challenge!
Wednesday, February 25, 2009
Hot Cocoa Mix
I forgot I had this recipe and I have no idea where it came from but it is wonderful. It tastes better than the store bought mixes.


Hot Cocoa Mix
8 Cups Non-fat Instant Dry Milk
2 Pounds Powdered Sugar
3 Cups Cocoa Powder
11 oz. Non Dairy Creamer
2 Large Packages Instant Vanilla Pudding Mix
2 tsp. Salt
Milk all ingredients together well in a big bowl. Have a storage container ready. After mixture is well mixed, grind in small amounts in a blender or coffee grinder until powdery fine. Keep in an airtight container. Can last a year or more (ours has been in the pantry for about 1 1/2 and it still tastes great).
To make Cocoa:
Take about 1 cup hot water and add 3 to 4 heaping Tbsp's of the mix.
Or, take some hot water in a mug and add enough of the mix until it tastes good to you!
Enjoy!
Linked to Grocery Cart Challenge's recipe swap.
Wednesday, February 11, 2009
Homemade Crock Pot Yogurt
I got this recipe from A Year of CrockPotting. You should really check out that site, lots of good stuff on there. If you would like to see the original recipe, go here.
I really think this recipe is the coolest one I have. I can't believe I can make yogurt, at home, in my crock pot. You know what else is unbelievable? It's edible.
As most of you know, plain yogurt can be very sour. So, to fix that, use a sweetener of your choice to sweeten it up and take a lot of the sourness away.
Some ways we use plain yogurt:
1. Sweeten to taste with honey and add some kind of fruit, ex. mandarin oranges (which is one of my favorites), banana, peaches, strawberries, etc.
2. Sweeten to taste, cinnamon, and vanilla (I wish I had exact measurements for you, but I don't. Just add a little at a time until it tastes just right.)
3. Use in place of sour cream when cooking or baking. Now, I really like the taste of sour cream. I would not use the yogurt as a garnish in place of sour cream. But, the other night I was making creamy chicken enchiladas and the recipe called for sour cream inside the enchiladas. It was then going to be baked. I ran out of sour cream so I tried the yogurt. I couldn't even tell their was a difference and the yogurt had 1/3 of the calories that the sour cream had. I would do it again. (I will post the enchilada recipe soon.)
4. If any of you have any great uses for yogurt or any favorite ways to eat it, let me know. I love trying new things.
One more thing. I make a gallon at a time because my family is so big (7 of us). If this seems like to much, cut the recipe in half.
Homemade Crock Pot Yogurt
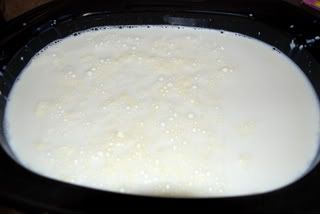
1 Gallon Milk (I use 2%)
1 Cup Starter Yogurt (Go buy some plain yogurt at the store and use this. Just make sure that it says LIVE ACTIVE CULTURES or something to that effect on the container. You can also go to a health food store and buy some dried starter. If you do this, you will need 20 grams of the dried stuff.)
(This is the milk before I turned it into yogurt)
1. In your crock pot, pour in your milk, cover, and turn on to low.
2. Let cook for 2 1/2 hours.
3. Turn off crock pot and let sit for 3 hours. Don't touch it. Don't open the lid.
4. Open the lid and take out 2 cups of the warm milk.
5. Stir in the Starter, either the yogurt starter or the powder stuff, into the 2 cups of milk.
6. Dump this back into the milk in the crock pot.
7. Cover.
8. Take 2 or 3 big bath towels and rap them around the crock pot for insulation.
9. Let sit for about 8 hours. (If you plan it right, you can go to bed while it sits for the 8 hours.)
10. Take out one cup of the yogurt and freeze. (This is the starter for the next batch)
11. Refrigerate and enjoy!

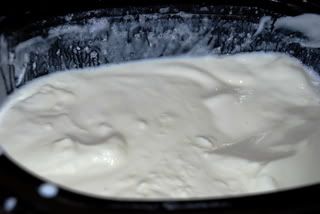
(I had already started putting it in tupperware before I remembered to take a picture.)
If you want thicker yogurt, because it will be kind of runny:
1. Line a colander with some cheese cloth.
2. Let the colander dangle inside a pot and cover.
3. Refrigerate for a few hours to a day, depending on how thick you like it. When I let it sit for a full day, it ends up thick like sour cream.
Making yogurt saves me a ton of money. Last week, Costco had milk for $1.84/Gallon. Yogurt this week cost me $1.84/Gallon + the cost of electricity. So, maybe $2.00. It normally costs me almost $3.00 per Quart or $12.00/Gallon of yogurt if I buy it from the store. I save $10.00 every time I make it myself.
P.S. The next time I make it, I will be adding some unflavored gelatin to it to see if the texture is a bit more store like. I will let you know how it turns out.
Tuesday, February 3, 2009
Granola Bars
I have a friend that can make anything wonderful, or at least the stuff she brings us. Recently, she posted a granola bar recipe on her blog, A Spot to Reminisce and Discourse. The recipe she has gives you the basic guidelines for granola bars and is super easy to follow.
I made some granola bars today and they are so good, I had to post them on here. I will give the recipe I used, but remember, the other recipe let's you make them what you want.
Granola Bar Recipe
Makes as many bars as you cut them into.

2 Cups Oats
3/4 Cups Chopped Pecans
3/4 Cups Chopped Walnuts
1/2 Cup Flax Seed
1/2 Cup Honey
1/4 Cup Brown Sugar
1 Tbsp. Butter
1 tsp. Vanilla (I actually forgot the vanilla, but they were still good. Next time I will add it.)
1/2 Cup Craisins
1. Preheat oven to 350 degrees F.
2. Mix oats, nuts, and flax seed together in 8X8 baking dish and put in oven for 15 minutes, stirring once at about 7 1/2 minutes.
3. In a large bowl put honey, sugar and butter together and put in microwave for 1 minute. Stir. Put back in microwave for another minute. Stir. Repeat until really hot.
4. Add vanilla. Stir.
5. When oat mixture is done, dump all the oats, nuts, and seeds into big bowl and stir until every is well coated with sugar mixture. Turn oven down to 300 degrees F.
6. Add in Craisins and mix well.
7. Grease same 8x8 baking dish and put oat mixture back into it.
8. Using wax paper or parchment paper (I bet foil would work), push firmly on the oat mixture until it is flat and uniform in pan.
9. Bake for 25 minutes.
10. Let cool in pan.
11. When cool, dump out (you may need to take a knife around the edge of pan like I did) and cut.
*Side note: Make sure they are COMPLETELY cool or they will crumble.

The photo above is how thick I cut them (as you can see, mine are bigger than yours will be. I doubled the recipe).

and then I put them in little snack baggies. This way the kids can just grab one and go.
I hope you enjoy them.
Subscribe to:
Posts (Atom)