Paleo Pancakes (my version)
*Recipe is good for one person
1 Egg
1 Ripe Banana
1 Heaping TBSP Almond Butter
Heat a pan over medium heat. Grease pan. Mix all ingredients together very well. Cook on pan until golden on both sides.
Makes about 3 pancakes.
I also added a few blueberries to each pancake. They were so good! These pancakes were fluffy and felt like normal pancakes in my mouth. This is our new "go to" pancake recipe.
Showing posts with label Recipes. Show all posts
Showing posts with label Recipes. Show all posts
Thursday, December 29, 2011

Brussel Sprouts with Bacon
2 lbs brussel sprouts, cleaned and chopped
1 medium onion, diced
1 lb bacon, chopped raw
In large skillet over medium high heat, cook bacon. When bacon is half way cooked add in the onion and brussel sprouts. Cook until bacon is crispy and sprouts are nice and soft.
Salt and pepper if needed.
1 medium onion, diced
1 lb bacon, chopped raw
In large skillet over medium high heat, cook bacon. When bacon is half way cooked add in the onion and brussel sprouts. Cook until bacon is crispy and sprouts are nice and soft.
Salt and pepper if needed.
Monday, December 26, 2011
Black Bean and Corn Salsa
1 Can Black Beans, drained
1 Can Corn, drained
1 bunch Cilantro, chopped
1 Onion, red or white
Tomatoes, as many as you want, diced (or 1 can drained diced tomatoes(I also added half a can of Rotel tomatoes for a little kick))
1 Tbsp Lime Juice
Dressing:
About 1 Cup Mayo
About 1/4 cup heavy cream
2 tsp. cumin
1 garlic clove, minced
salt and pepper to taste
Mix all together and let marinate in the fridge for at least an hour. Perfect with tacos or as a dip or all by itself.
1 Can Corn, drained
1 bunch Cilantro, chopped
1 Onion, red or white
Tomatoes, as many as you want, diced (or 1 can drained diced tomatoes(I also added half a can of Rotel tomatoes for a little kick))
1 Tbsp Lime Juice
Dressing:
About 1 Cup Mayo
About 1/4 cup heavy cream
2 tsp. cumin
1 garlic clove, minced
salt and pepper to taste
Mix all together and let marinate in the fridge for at least an hour. Perfect with tacos or as a dip or all by itself.
Friday, December 2, 2011
23 Days Until Christmas and Popcorn Recipe
Day 2
Today is Friday and we have Christmasy plans for the evening. We get to decorate the city Christmas Tree and have a little party with my oldest daughters' Girl Scout troop. After this, we are headed to Barnes and Noble's to sing carols and read Christmas stories.
When we get home (and so we can include the kids who aren't able to make the Girl Scout events), we are going to watch Jim Carrey's A Christmas Carol... with popcorn of course!
Here is our most favorite popcorn recipe:
1/4 Cup Coconut Oil
1 Cup Popcorn Kernals
1 Big Pop with good lid (the popcorn will almost fill the pot. This makes a lot of popcorn)
Pop holders
Real Butter (we use about 3/4 of a stick for this pot's worth)
On stove over medium heat, melt coconut oil in pot. Dump in the popcorn kernels and put lid securely on. Using the pot holders (because sometimes steam will escape or the handles will get too hot), shake the pot every few seconds until the kernels start to pop. Once they are popping, shake the pop continuously so the popcorn doesn't burn. Make sure the pot stays in contact with the heat source. (You kind of swirl the pot over the burner). The popping noise will start to slow down and when you only hear one or two pops every few seconds, remove the pot from the heat. Take the lid off immediately (beware of steam) so the kernels don't get wet. Melt some butter, drizzle over popcorn and toss the popcorn so it gets all over the kernels, season to your preference and enjoy!
Today is Friday and we have Christmasy plans for the evening. We get to decorate the city Christmas Tree and have a little party with my oldest daughters' Girl Scout troop. After this, we are headed to Barnes and Noble's to sing carols and read Christmas stories.
When we get home (and so we can include the kids who aren't able to make the Girl Scout events), we are going to watch Jim Carrey's A Christmas Carol... with popcorn of course!
Here is our most favorite popcorn recipe:
1/4 Cup Coconut Oil
1 Cup Popcorn Kernals
1 Big Pop with good lid (the popcorn will almost fill the pot. This makes a lot of popcorn)
Pop holders
Real Butter (we use about 3/4 of a stick for this pot's worth)
On stove over medium heat, melt coconut oil in pot. Dump in the popcorn kernels and put lid securely on. Using the pot holders (because sometimes steam will escape or the handles will get too hot), shake the pot every few seconds until the kernels start to pop. Once they are popping, shake the pop continuously so the popcorn doesn't burn. Make sure the pot stays in contact with the heat source. (You kind of swirl the pot over the burner). The popping noise will start to slow down and when you only hear one or two pops every few seconds, remove the pot from the heat. Take the lid off immediately (beware of steam) so the kernels don't get wet. Melt some butter, drizzle over popcorn and toss the popcorn so it gets all over the kernels, season to your preference and enjoy!
Saturday, January 22, 2011
Weekly Meals using my Bountiful Basket
This week, I not only got the regular basket, but I added on the Italian pack from Bountiful Baskets. You should also know, I order two baskets each week because we are a family of 7 and I am an evil mom who loves to throw fresh vegetables into everything I can. We eat way more vegetables a week than we do fruit. I have always cooked this way because I enjoy torturing my kids as much as humanly possible (insert big grin here). I didn't get to make some of the recipes from last week (extremely busy week!!), so I will be adding them on to this week.
Here are the recipes I will be using this week to use up our produce. The bullet points are the items from the basket are to be used with the dish is under.
Eggplant Parmesan w/ a Salad and homemade bread
In no particular order (because some days end up being too hard to make time consuming dishes):
Chili Verde on Rice w/ a Salad
- Chili Verde: Tomatillos, green chilis, garlic, jalapenos, cilantro, onion
- Salad: Romaine, tomatoes, some red onion
Potato Soup
- No recipe, yet. I will try to remember to write down how I make it. I will tell you it has potatoes, onion, celery, cooked bacon all crumbled up, I will probably add the broccoli in this and see how it turns out, chicken broth, herbes de province (seasoning), salt, pepper. I cover all the produce with the broth, about 2 to 3 inches above, and let it simmer until the potatoes are falling apart (this is what thickens the broth. I don't like using flour). I stir in non-fat plain yogurt (tastes like sour cream this way with none of the fat and calories). Top with a little cheese.
- Eggplant Parmesan: eggplant, garlic, basil
- Salad: Romaine, tomatoes, some red onion
Turkey Burgers w/ pan cooked diced potatoes
- Burger: zucchini, red onion (probably the last of it), garlic
- Potatoes: Season with salt, pepper, and fresh rosemary. Coat a pan with olive oil and let heat up. Add potatoes and cook until tender in the middle and crispy brown on the outside, stirring often so they don't burn.
Roasted Butternut Squash and Bacon Pasta w/ Broccoli and Garlic bread
- Pasta: butternut squash, fresh rosemary
- Asparagus: Rub olive oil on them and sprinkle with salt and pepper and grill in a pan on the stove. (my kids sneak asparagus off the cooking pan when I cook it like this)
- Soup: savoy cabbage, onion, thyme, potato, mushrooms, parsley
I am not going to do a seventh meal. I need a night for leftovers.
If you have any questions, don't hesitate to ask! Have a happy, healthy week!
Friday, January 8, 2010
Banana Crisp
I made this recipe up by trying some other things lately. I never would have thought that cooking a banana would be so good. I like raw bananas just fine, but I don't eat them often. Cooked, they are amazing!

Ingredients:
Bananas--however many you will eat
1 Cup oats
1 Cup butter
1 Cup brown sugar
Directions:
1. Pick a baking dish--any size (I have used an 8x8 and a 9x13).
2. preheat oven to 400 degrees F.
3. Mix 1/2 cup cold butter and the sugar until creamy.
4. Add in the oats and mix until combined. Set Aside. (This makes enough for a 9x13 size pan. You can refrigerate the rest for a later batch.)
5. Place the rest of the butter into the baking dish and put into oven until just melted.
6. Take the baking dish out and cut bananas in half length wise.
7. Place the cut bananas into the baking dish cut side down. You want them side by side--slightly squished together.
8. Sprinkle the oat mixture all over the top of the bananas. Cover them good.
9. Bake for about 15 minutes.
10. Serve with some vanilla ice cream or whipped cream. Enjoy!
Post linked to Grocery Cart Challenge.
Thursday, December 31, 2009
Resolutions and Orange Cranberry Scones
I know we are supposed to have wonderful things planned out for the year ahead and I really love the idea, but I NEVER follow through. Within 24 hours of the year coming in, I completely forget I made a resolution until around July. In July I think "Well, shit."

So, for this year I am going to continue the things I like in my life:
- I hope to continue to succeed in school (it makes me proud of myself).
- I plan to continue to eat smaller portions and watch my weight (it is too hard to lose to put it all back on again).
- I hope to continue to successfully homeschool the 8 yr. old (because I really don't want to screw this up).
- I plan to continue to spend quality time with the Family each week (which isn't too hard because I feel guilty with all the time I spend at school and work).
- I plan to continue to cook healthy meals for my Family (Or have the hubby cook healthy meals for the Family ;).
And one new one:
- I plan on buying a new washer or gently used washer immediately in the new year!
Happy New Year Everyone! I hope everyone is able to accomplish ALL their New Year's Goals this year. This Year can be the year of Success!
_______________________________
And to bring in the New Year, here is a recipe to my most favorite pastry EVER!
Orange Cranberry Scones
Ingredients:
One medium to large Orange
1/2 C. Very cold Butter (not the fake stuff)
2 C. Flour
2 tsp. Baking Powder
1/2 tsp. Salt
2 Tbsp. Sugar
1/2 Cup diced Fresh Cranberries (I am sure you could use the dried and sweetened ones, just leave out the 2 Tbsp. Sugar)
Directions:
Preheat oven to 400 degrees
1. Zest the entire orange, set aside.
2. Then squeeze all the juice out of the orange (pulp is good, but not chunks), set aside.
3. I did it all in my food processor: Sift the Flour, Sugar, Salt, and Baking Powder together.
4. Cut the butter into small squares and mix it into the flour mixture. You want the mixture crumbly, but you don't want big chunks of butter. This is where a food processor really comes in handy because you want the butter to stay as cold as possible. This is what makes the scone flaky.
5. Add in the zest and the cranberries. Mix until coated. (I pulsed it a couple of times).
6. Drizzle in the orange juice and stir or pulse. Be careful not to add in too much liquid, you don't want the mixture sticky. You do want it to form a ball. If you don't have enough juice from the orange, just add in a little store bought juice.
7. Divide dough into 8 pieces and form into whatever shape you want.
8. Place on baking sheet (I use stoneware) and bake for about 15-20 minutes. You want them to be slightly golden brown on top.
Directions for the icing glaze:
Ingredients:
1 Cup Powder Sugar
2 to 3 Tbsp. Milk or Orange Juice
Directions:
Put powder sugar into bowl and drizzle in the liquid one tablespoon at a time, mixing well between each until you get the consistency you want.
Wednesday, December 23, 2009
This and That and Gooey Chex Mix
I got my final grades today and I did much better than I ever have in school! School has never been my "thing." I have always struggled with school....Did I mention I dropped out of high school in the 9th grade? (I did take something similar to the GED and passed the first time).

So, here is the final tally:
Biology: B
History: A-
Communications/Speech: A-
English Literature: A- (I got an A on that 8-page paper I was writing)
I am so proud of myself!
_________
Yesterday, I made a whole bunch of some of the best Chex mix I have ever made for all the residents I help take care of--all 37 of them. They really liked it and it was fun. (recipe at the bottom). I had two of the ladies ask me for the recipe because they want to make it for their families. Yeah, umm, these ladies don't have a kitchen... But, I obliged and gave it to them anyway. Maybe they can convince their families to make it.
I am also giving out my pomegranate jelly to friends, neighbors, and co-workers. So far, everyone who has gotten one is really excited. Most have not tried it before, but are so excited to try it. I love seeing how happy everyone looks when they get one!
What do you give out for Christmas?
_________
Did you guys realize Christmas is in 3 Days?! I can't believe how close it is. We still haven't decorated the tree or done anything Christmasy. So, we are going to cram a whole bunch of stuff into the next 3 days.
Today: Decorate 1 Christmas tree (and clean the house).
Tomorrow: Bake cookies and decorate them (and possibly make a run to the laundry room).
Christmas eve: Big Dinner and look at lights.
_________
Gooey Sweet Chex Mix
Into one really big bowl:
6 Cups Honey Grahams
6 Cups any Chex Cereal
1 Cup Slivered Almonds
1 Cup Shredded Coconut
Into a medium sized sauce pan on medium heat:
1 Cup Butter and let it melt and then add
1 Cup Light Corn Syrup
1 Cup Sugar
Let the mixture come to a boil. Let it boil for 3 to 4 minutes. It will start to turn a light tan color, this is good.
Here is the best method I have found for mixing this: Drizzle some of the hot mixture over the cereal mix and stir. Pour more of the hot mix over the cereal and then stir. REPEAT until all the sugar mix is incorporated into the cereal mix. (I tried to dump it all on top the first time I made it and the sugar mixture cooled down way to fast and it was hard to evenly coat the cereal.)
Next, lay it all out on parchment paper. Try and spread it out. Let it cool completely.
Enjoy!
Thursday, November 19, 2009
Berry Berry Streusel Bars-A.K.A. Granola Bars
Years ago, I was given this recipe from a friend. I quickly fell in love with it. I have played with it and played with it until it has become a favorite snack/dessert/breakfast treat for all of us. It is originally from QuakerOats.com. I hope you enjoy as much as we do!


You are only going to see pictures like this because it went from the pan to all gone in 60 seconds flat. (Have I mentioned my 6'3" 14 yr old who is a walking stomach?)
You can see the yummy jelly coming up through the topping. Yum!
Berry Berry Streusel Bars - A.K.A. Granola Bars
1 1/2 Cups Oats (old fashioned OR instant-it doesn't matter)
1 1/4 Cups Flour (I like to use half whole wheat flour)
1/2 Cup Brown Sugar, packed
12 Tbsp. Very Cold Butter (it helps it be crunchy on the outside and soft in the middle)
1 Jar (about 8 oz.) of your favorite Jelly or Jam
1 tsp. flour
Preheat oven to 350 degrees F.
1. Mix together oats, flour, and brown sugar.
2. Cut in the butter, like a pie crust. You want the mixture to be crumbly. I use my stand mixer or food processor to help with this.
3. In a greased 8x8 or 9x9 pan, press in about 1/2 to 2/3 of the oat mixture. Save the rest for the topping. Press it in good.
4. Bake for 13 to 15 minutes. You want it just barely starting to brown.
5. While that is baking, mix together the jam and 1 tsp. flour. (When I double the recipe, I use a Tbsp. of flour to 16 oz. of jelly). Mix it well.
6. After you pull the crust out of the oven, pour the jam mix all over the top. Spread it out as evenly as possible. If you can help it, try not to get the jelly onto the pan sides. It tends to become a bit sticky.
7. Take the rest of your oat mixture and sprinkle it, using your fingers, all over the top. Cover the jelly with the topping as best you can and gently press it down into the jelly using your hands.
8. Bake for another 20 to 25 minutes or until golden brown on top.
9. Cut into squares and enjoy!
For more fun recipes to try, go over to the Grocery Cart Challenge every Thursday for their recipe swap!
Saturday, November 14, 2009
Pomegranates

I love pomegranates. When I was a kid my mom would get me one pomegranate each year. (They were too expensive to get more than that.) To me, pomegranates are special. They are a treat that is fun to eat. (Beware, they stain.) They are beautiful.


Now, I have a pomegranate tree in my backyard. Each year I get to torture my children by having them help me take out each and every little, red, juicy pearl inside. We watch a movie or 4 and sit down and get tired of pomegranates really quick get busy. I then juice them using my Kitchen Aid Mixer with the fruit and vegetable strainer attachment (also great to make applesauce with.) It's awesome, I find little spots of pomegranate juice for weeks. This year we got four gallons of juice from our tree. So, I made pomegranate jelly. Lot's of pomegranate jelly. Twenty-four pints and thirty-six 8-oz jars of pomegranate jelly.
It's delicious.
Here is my recipe for pomegranate jelly:
5 Cups Pomegranate Juice
1 Tbsp. Lemon Juice (this helps keep out bacteria)
1 tsp. Butter (this helps keep the foam down, you'll see.)
6 1/2 Cups Sugar (preserves the jam so it doesn't rot)
1 box Powdered Pectin
1. Measure out the sugar in a separate bowl.
2. In a VERY big pot (It boils really big), start heating up the pomegranate juice on medium high heat.
3. Add in the pectin.
4. Stir until boiling.
5. Add in all the sugar.
6. Keep stirring.
7. When it comes to a full rolling boil, let it boil for one minute while you stir constantly.
8. Turn off the heat and using a spoon (it helps if the spoon is cold), dip it into the jelly and within a few second you will be able to tell if it jelled.
9. Put into jars and process jars according to whatever method you want to use, water bath canning or pressure canning.


It can take a couple of weeks for the jelly to fully form like the one above, but you can tell immediately if the jelling worked because it will look something like a thick jell. If it didn't work, you can redo the process. This SITE has great instructions for redoing the jelly.
*Make sure you use enough sugar or the jelly won't set right.
*Also, don't double the recipe or it won't work right either.
Out of one pot, I got about 7 little 8-oz jars or 4 pint jars and one 8-oz jar.
This post is linked to Grocery Cart Challenge.
Sunday, September 27, 2009
Amish Friendship Bread

About a year ago a friend gave me the starter for Amish Friendship Bread. I followed the directions perfectly and got the most yummy bread. It is along the lines of banana bread or zucchini bread or maybe a coffee cake.
Unfortunately, making two loaves of this high calorie bread every 10 days gets old, quickly. It is also easy to run out of people to give the starter to. So, the last time I made it, about 6 months ago, I froze the starter instead of passing it out and making more bread.
Last Monday, a co-worker of mine asked me if I knew how to make the starter because she wanted to make the bread. That was when I remembered I had the starters in the freezer. I gave her one and decided to make one for the family. So, watch out. I have starter to give away!
Here is how to do it if you receive a starter from a friend:
*Note: Do not use metal utensils or metal bowls. Do not refrigerate the starter.
Day 1: This is the day you receive the starter. Do nothing to the batter on this day.

Day 2: Squish the bag thoroughly. (If the bag starts to blow up on any of the days, just let the air out.)


(See the bubbles? Those are good. You want those.)
Day 3: Squish the bag thoroughly.
Day 4: Squish the bag thoroughly.
Day 5: Guess what? Squish the bag thoroughly.
Day 6: Add 1 cup flour, 1 cup sugar, and 1 cup milk to the bag. Squish the bag thoroughly.
Day 7: Squish the bag thoroughly.
Day 8: Squish the bag thoroughly.
Day 9: Squish the bag thoroughly.
Day 10 (AKA baking day): Add 1 cup flour, 1 cup sugar, and 1 cup milk and squish it all up. Take out three cups of the starter out of the bag and put into individual gallon bags in one cup increments. In other words, put one cup of starter in each bag. You can give these bags away to people you know, or don't know. You can freeze* them and start them over at a later date.
It's over! You get to bake your bread today!
I found this new recipe for the starter and decided to try it. I decided to put some apples in the bread today because apples and fall go together.
Recipe:
Starter
2 cups flour
1/2 cup sugar
2 tsp. baking powder
1 tsp. baking soda
1 1/2 tsp. cinnamon
1 tsp. salt
3 eggs
2/3 cup oil (you can substitute half the oil with some sort of fruit puree.)
1 tsp. vanilla
I also added in 2 tart apples (averaging one for each loaf), peeled, cored, and diced (you can also change the fruit or add no fruit at all).
Preheat oven to 350 degrees F.
1. Take the remaining starter and put it into a bowl.
2. Add all the wet ingredients to it, except the apples, and mix thoroughly.
3. In a separate bowl, mix together all the dry ingredients.
4. Add dry ingredients to the wet ingredients and mix thoroughly.
5. Fold in the apples
6. Grease 2 loaf pans and sprinkle the bottom and sides generously with cinnamon sugar.

(Can you see the cinnamon sugar on the side of the bread? Kind of?)
7. Divide batter equally, as best you can, between the pans.
8. Bake for 50 minutes or until done. (use a toothpick or a clean knife.)

*Variations: Try pumpkin puree with some raisins or carrots and raisins. Substitute half the white flour for whole wheat. Use brown sugar instead of white or half and half. This is a base recipe, play with it.
*About freezing: if you freeze your starter, it won't freeze solid. It stays mushy. When you take it out of the freezer, let it sit out for an hour or two to come to room temperature. At this point, you can either use it immediately to bake with or you can let this be day one and start the 10 day process over.
Saturday, September 12, 2009
Banana Oatmeal Chocolate Chip Cookies
I had some bananas I HAD to use. You know the kind: almost, but not quite yet, oozing onto the counter. The kind that you look at and think "mmmm, banana bread." Except today I decided to get online and see if I could find something different to do with my bananas. Here is what I found: Low Fat Banana Oatmeal Cookies.
Only, my version are NOT low fat and I altered the recipe a bit. I really like these. They remind me of Fall and taste a bit like banana bread.

1/2 Cup Sugar
1/2 Cup Brown Sugar
1 Cup Softened Butter
2 Eggs
2 tsp. Vanilla
2 Cups Flour
1 tsp. Baking Soda
2 tsp. Cinnamon
1/2 tsp. Ground Cloves
3 Ripe Bananas, mashed
2 Cups Rolled Oats
1 Cup Chocolate Chips
1. Preheat oven to 375 degrees
2. In a large bowl mix together sugars and butter until creamy.
3. Add in eggs, vanilla, and bananas.
4. In a separate bowl mix together all dry ingredients except the oats and chocolate chips.
5. Add dry ingredients into wet and mix well.
6. Fold in oats and chocolate chips.
7. Drop by spoonful onto baking sheet.
8. Bake for 10-14 minutes.
9. Let cool a few minutes before trying to take them off the pan or they will fall apart.
For more great recipes, check out The Grocery Cart Challenge!
Tuesday, August 18, 2009
Crock Pot Salsa Chicken
Sorry, I forgot to take a picture.
8 boneless skinless chicken breasts
2 15 oz. cans corn
2 15 oz. cans beans~kidney, black, pinto, your choice (I used great northern white beans because that's all I had)
2 16 ounce jars salsa (I use one medium heat and one mild)
32 ounces plain yogurt or sour cream (I use yogurt because it is so much lower in fat and calories and when added I can't tell the difference and neither can my kids.)
Shredded cheese
Put all ingredients into the crock pot, except the yogurt and cheese. Cook on high for about 4 hours or low for about 6 to 8 hours.
When chicken is cooked through, shred it as best you can. Add yogurt and stir well. Serve over rice and sprinkle a little cheese over the top.
This recipe feeds the 7 of us with left overs. If you are a small family, cut it in half.
Monday, April 13, 2009
Cinnamon Rolls
For some really yummy cinnamon rolls:
Take this recipe: The Pioneer Woman Cinnamon Rolls
and this frosting:
Caramel Glaze
1/3 Cup evaporated milk
2 Tbsp. brown sugar
1 1/2 Cups powdered sugar
1 tsp. vanilla
In a small pot over medium heat, mix the evaporated milk with the brown sugar, stirring constantly, until the mixture starts to boil. Remove from heat. Add in powdered sugar and vanilla and mix with some sort of electric mixer until creamy, about 2 minutes. Pour over cinnamon rolls.
If you want enough frosting to cover ALL the cinnamon rolls from The Pioneer Woman, triple the batch.
I really like The Pioneer Woman's dough. They turn out great and I can freeze a bunch of pans before letting them rise. (When you want cinnamon rolls, take the pan out of the freezer and set on your counter. As the dough defrosts, they will rise.) I just don't like her glaze much.
Unfortunately, there are no pictures at this time. As soon as I make some more I will try to remember to take a picture before we devour them.
Wednesday, February 25, 2009
Hot Cocoa Mix
I forgot I had this recipe and I have no idea where it came from but it is wonderful. It tastes better than the store bought mixes.


Hot Cocoa Mix
8 Cups Non-fat Instant Dry Milk
2 Pounds Powdered Sugar
3 Cups Cocoa Powder
11 oz. Non Dairy Creamer
2 Large Packages Instant Vanilla Pudding Mix
2 tsp. Salt
Milk all ingredients together well in a big bowl. Have a storage container ready. After mixture is well mixed, grind in small amounts in a blender or coffee grinder until powdery fine. Keep in an airtight container. Can last a year or more (ours has been in the pantry for about 1 1/2 and it still tastes great).
To make Cocoa:
Take about 1 cup hot water and add 3 to 4 heaping Tbsp's of the mix.
Or, take some hot water in a mug and add enough of the mix until it tastes good to you!
Enjoy!
Linked to Grocery Cart Challenge's recipe swap.
Saturday, February 14, 2009
Homemade Stove Top Mac and Cheese
I just love finding good recipes to replace the stuff I won't buy (mac and cheese in a box). I was watching Good Eats one night, because I have pretty much watched it at least once a week for about 5 years now, probably longer. I really like Alton Brown. I love that he gives the science behind the cooking. I will say that I probably won't buy one of his cookbooks because they sort of read like a textbook.
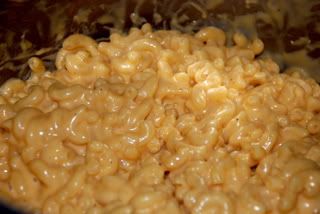
So, like I said I was watching him one night and the show was on how cheese melts. When he came to the Stove Top Mac and Cheese, I was captivated. I had to try it. I mean, not only was it a great replacement to the box crap, it has NO flour. Needless to say (because I am me), I have made a minor change to the original because, well, I just had to.
Easy Mac and Cheese Recipe

1 pound Elbow Macaroni Noodles
4 Tbsp. Butter
4 Eggs
12 oz. Evaporated Milk
1 tsp. Hot Sauce (like Tabasco Sauce)
2 tsp. Kosher Salt
1 tsp. Ground Mustard
Pepper to taste
20 oz. Grated Cheddar/Monterey Jack Blend (this is where I get lazy and buy it already grated.)
1. Bring a large pot of water to a boil and add in the noodles. Let cook until al dente. You really don't want the noodles to overcook because then they will collapse when you add the ingredients to it.
2. In the meantime, mix all the rest of the ingredients, except the cheese, together in a medium bowl. Mix well.
3. Drain the noodles and melt the butter in the pot.
4. Put the noodles back into the pot and coat them really well with the butter.
5. While stirring the egg mixture, slowly start dumping in some hot noodles into it. Add about 2 cups of the noodles into the egg mixture while stirring.
6. Add the egg mixture into the pot while stirring the noodles in the pot. You don't want the eggs to scramble.
7. While stirring the stuff in the pot, start adding the shredded cheese by the handful.
8. After all the cheese has been added, stir until it has a smooth Mac and Cheese consistency.
I usually double this recipe every other week. I use 2 pounds of noodles. It makes a great side dish to some dinners, etc. It keeps pretty well in the fridge.
Wednesday, February 11, 2009
Homemade Crock Pot Yogurt
I got this recipe from A Year of CrockPotting. You should really check out that site, lots of good stuff on there. If you would like to see the original recipe, go here.
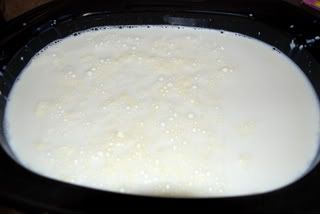
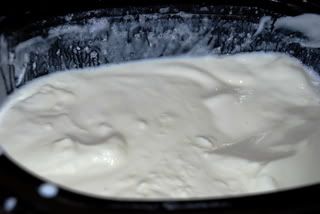
I really think this recipe is the coolest one I have. I can't believe I can make yogurt, at home, in my crock pot. You know what else is unbelievable? It's edible.
As most of you know, plain yogurt can be very sour. So, to fix that, use a sweetener of your choice to sweeten it up and take a lot of the sourness away.
Some ways we use plain yogurt:
1. Sweeten to taste with honey and add some kind of fruit, ex. mandarin oranges (which is one of my favorites), banana, peaches, strawberries, etc.
2. Sweeten to taste, cinnamon, and vanilla (I wish I had exact measurements for you, but I don't. Just add a little at a time until it tastes just right.)
3. Use in place of sour cream when cooking or baking. Now, I really like the taste of sour cream. I would not use the yogurt as a garnish in place of sour cream. But, the other night I was making creamy chicken enchiladas and the recipe called for sour cream inside the enchiladas. It was then going to be baked. I ran out of sour cream so I tried the yogurt. I couldn't even tell their was a difference and the yogurt had 1/3 of the calories that the sour cream had. I would do it again. (I will post the enchilada recipe soon.)
4. If any of you have any great uses for yogurt or any favorite ways to eat it, let me know. I love trying new things.
One more thing. I make a gallon at a time because my family is so big (7 of us). If this seems like to much, cut the recipe in half.
Homemade Crock Pot Yogurt
1 Gallon Milk (I use 2%)
1 Cup Starter Yogurt (Go buy some plain yogurt at the store and use this. Just make sure that it says LIVE ACTIVE CULTURES or something to that effect on the container. You can also go to a health food store and buy some dried starter. If you do this, you will need 20 grams of the dried stuff.)
(This is the milk before I turned it into yogurt)
1. In your crock pot, pour in your milk, cover, and turn on to low.
2. Let cook for 2 1/2 hours.
3. Turn off crock pot and let sit for 3 hours. Don't touch it. Don't open the lid.
4. Open the lid and take out 2 cups of the warm milk.
5. Stir in the Starter, either the yogurt starter or the powder stuff, into the 2 cups of milk.
6. Dump this back into the milk in the crock pot.
7. Cover.
8. Take 2 or 3 big bath towels and rap them around the crock pot for insulation.
9. Let sit for about 8 hours. (If you plan it right, you can go to bed while it sits for the 8 hours.)
10. Take out one cup of the yogurt and freeze. (This is the starter for the next batch)
11. Refrigerate and enjoy!

(I had already started putting it in tupperware before I remembered to take a picture.)
If you want thicker yogurt, because it will be kind of runny:
1. Line a colander with some cheese cloth.
2. Let the colander dangle inside a pot and cover.
3. Refrigerate for a few hours to a day, depending on how thick you like it. When I let it sit for a full day, it ends up thick like sour cream.
Making yogurt saves me a ton of money. Last week, Costco had milk for $1.84/Gallon. Yogurt this week cost me $1.84/Gallon + the cost of electricity. So, maybe $2.00. It normally costs me almost $3.00 per Quart or $12.00/Gallon of yogurt if I buy it from the store. I save $10.00 every time I make it myself.
P.S. The next time I make it, I will be adding some unflavored gelatin to it to see if the texture is a bit more store like. I will let you know how it turns out.
Wednesday, February 4, 2009
Weight Watchers Garden Vegetable Soup
One of my favorite soups is this one from Weight Watchers. I have never "done" Weight Watchers. I would like to try it someday soon if I can't lose the remaining twenty pounds on my ass by my self. Now, my sister lost a lot of weight on Weight Watchers.
Anyway, this is such an easy go to soup recipe that I like to serve as a side. I have been thinking about adding some small noodles to it and making it more a meal. It is super low in calories as is and so very healthy.
Weight Watchers Garden Vegetable Soup
Makes 9 Cups
6 Cups Broth (use whatever kind you like)
2 Carrots, peeled and dice
4 tsp. Garlic or 4 Cloves Garlic, minced
1/2 a Head of Cabbage (the green stuff, don't skip this because it makes the soup. Also, it tastes much better cooked then raw.)
1/2 lb. Green Beans, cut small (frozen work well)
2 Tbsp. Tomato Paste
1 tsp. Dried Basil
1 tsp. Dried Oregano
1 tsp. Salt
1 Large Zucchini, diced
Cooking Spray
1. Spray a big pot with cooking spray over Meduim-High heat.
2. Saute the carrots, onion, and garlic for about 5 minutes or until the onion is translucent.
3. Add all the remaining ingredients, except the zucchini, and bring to a boil.
4. Cover, reduce heat to Medium-Low and simmer for about 15 minutes or until the carrots are cooked through.
5. Add the zucchini and let cook about 5 more minutes.
6. Enjoy
For more recipe ideas and for ways to save on your grocery bill, check out Grocery Cart Challenge.
Tuesday, February 3, 2009
Granola Bars
I have a friend that can make anything wonderful, or at least the stuff she brings us. Recently, she posted a granola bar recipe on her blog, A Spot to Reminisce and Discourse. The recipe she has gives you the basic guidelines for granola bars and is super easy to follow.
I made some granola bars today and they are so good, I had to post them on here. I will give the recipe I used, but remember, the other recipe let's you make them what you want.
Granola Bar Recipe
Makes as many bars as you cut them into.

2 Cups Oats
3/4 Cups Chopped Pecans
3/4 Cups Chopped Walnuts
1/2 Cup Flax Seed
1/2 Cup Honey
1/4 Cup Brown Sugar
1 Tbsp. Butter
1 tsp. Vanilla (I actually forgot the vanilla, but they were still good. Next time I will add it.)
1/2 Cup Craisins
1. Preheat oven to 350 degrees F.
2. Mix oats, nuts, and flax seed together in 8X8 baking dish and put in oven for 15 minutes, stirring once at about 7 1/2 minutes.
3. In a large bowl put honey, sugar and butter together and put in microwave for 1 minute. Stir. Put back in microwave for another minute. Stir. Repeat until really hot.
4. Add vanilla. Stir.
5. When oat mixture is done, dump all the oats, nuts, and seeds into big bowl and stir until every is well coated with sugar mixture. Turn oven down to 300 degrees F.
6. Add in Craisins and mix well.
7. Grease same 8x8 baking dish and put oat mixture back into it.
8. Using wax paper or parchment paper (I bet foil would work), push firmly on the oat mixture until it is flat and uniform in pan.
9. Bake for 25 minutes.
10. Let cool in pan.
11. When cool, dump out (you may need to take a knife around the edge of pan like I did) and cut.
*Side note: Make sure they are COMPLETELY cool or they will crumble.

The photo above is how thick I cut them (as you can see, mine are bigger than yours will be. I doubled the recipe).

and then I put them in little snack baggies. This way the kids can just grab one and go.
I hope you enjoy them.
Sunday, February 1, 2009
Cranberry Baked Oatmeal
I went looking for this recipe because I was getting really tired of the same old oatmeal. The kids and I really like this one. I made a few changes from the original, like cutting down the amount of sugar, no one needs to eat a 1/4 cup of sugar in the morning by themselves, and I cut the amount of butter. I like the taste of butter, but I think the taste can be there with a little bit of it.
Baked Oatmeal
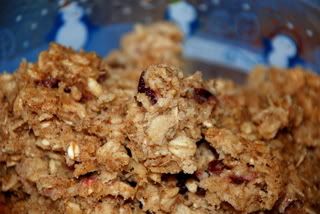
Baked Oatmeal

6 Cups Rolled Oats
1 Cup Brown Sugar
4 tsp. Cinnamon
4 tsp. Baking Powder
2 tsp. Salt
2 Cup Milk
4 Eggs
1/2 Cup Melted Butter
1/2 Cup Applesauce
4 tsp. Vanilla Extract
1 1/2 Cup Dried Cranberries
1. Preheat oven to 350 degrees F. Grease a 9X13 inch pan.
2. In a large bowl, mix together all the dry ingredients. Mix in all the wet ingredients. Stir in the cranberries.
3. Spread into pan.
4. Bake for 40 minutes.
4 tsp. Cinnamon
4 tsp. Baking Powder
2 tsp. Salt
2 Cup Milk
4 Eggs
1/2 Cup Melted Butter
1/2 Cup Applesauce
4 tsp. Vanilla Extract
1 1/2 Cup Dried Cranberries
1. Preheat oven to 350 degrees F. Grease a 9X13 inch pan.
2. In a large bowl, mix together all the dry ingredients. Mix in all the wet ingredients. Stir in the cranberries.
3. Spread into pan.
4. Bake for 40 minutes.
Linked to Grocery Cart Challenge's recipe swap.
Subscribe to:
Posts (Atom)